How to rate limit an API per customer or per API key
How to give each customer one shared rate limit across all their API keys, with exceptions per key.


If a customer can create API keys, they can create a second one. Put a limit on each key and that customer just doubled their quota. A free tier customer with five keys gets five times the free tier. And when sales promises Acme a higher limit, someone has to ship code to give it to them.
So you have to decide whether you're limiting each key or the customer behind it. Most APIs that sell access need both. This post sets up both with Unkey from a TypeScript backend, then does the same thing with no code on Unkey Compute.
Per key or per customer
A key limit counts each key on its own. Three keys at 100 requests a minute is 300 a minute. That's what you want for a key with its own job, like a partner integration that syncs data in bulk.
A customer limit counts every key the customer holds against one number. Three keys, 100 requests a minute, shared. Unkey calls the customer an identity. You create it with your own ID for that customer in externalId (a Stripe customer ID works), put the limit on it, and every key created with that externalId counts against it.
You can run both. If a key and its identity both have a limit with the same name, the key's limit wins for that key. So everyone at Acme shares 1,000 requests a minute, and the partner sync key gets its own 5,000.
Step 1: Create a keyspace and a root key
Sign in at app.unkey.com.
- Open Root Keys in the sidebar.
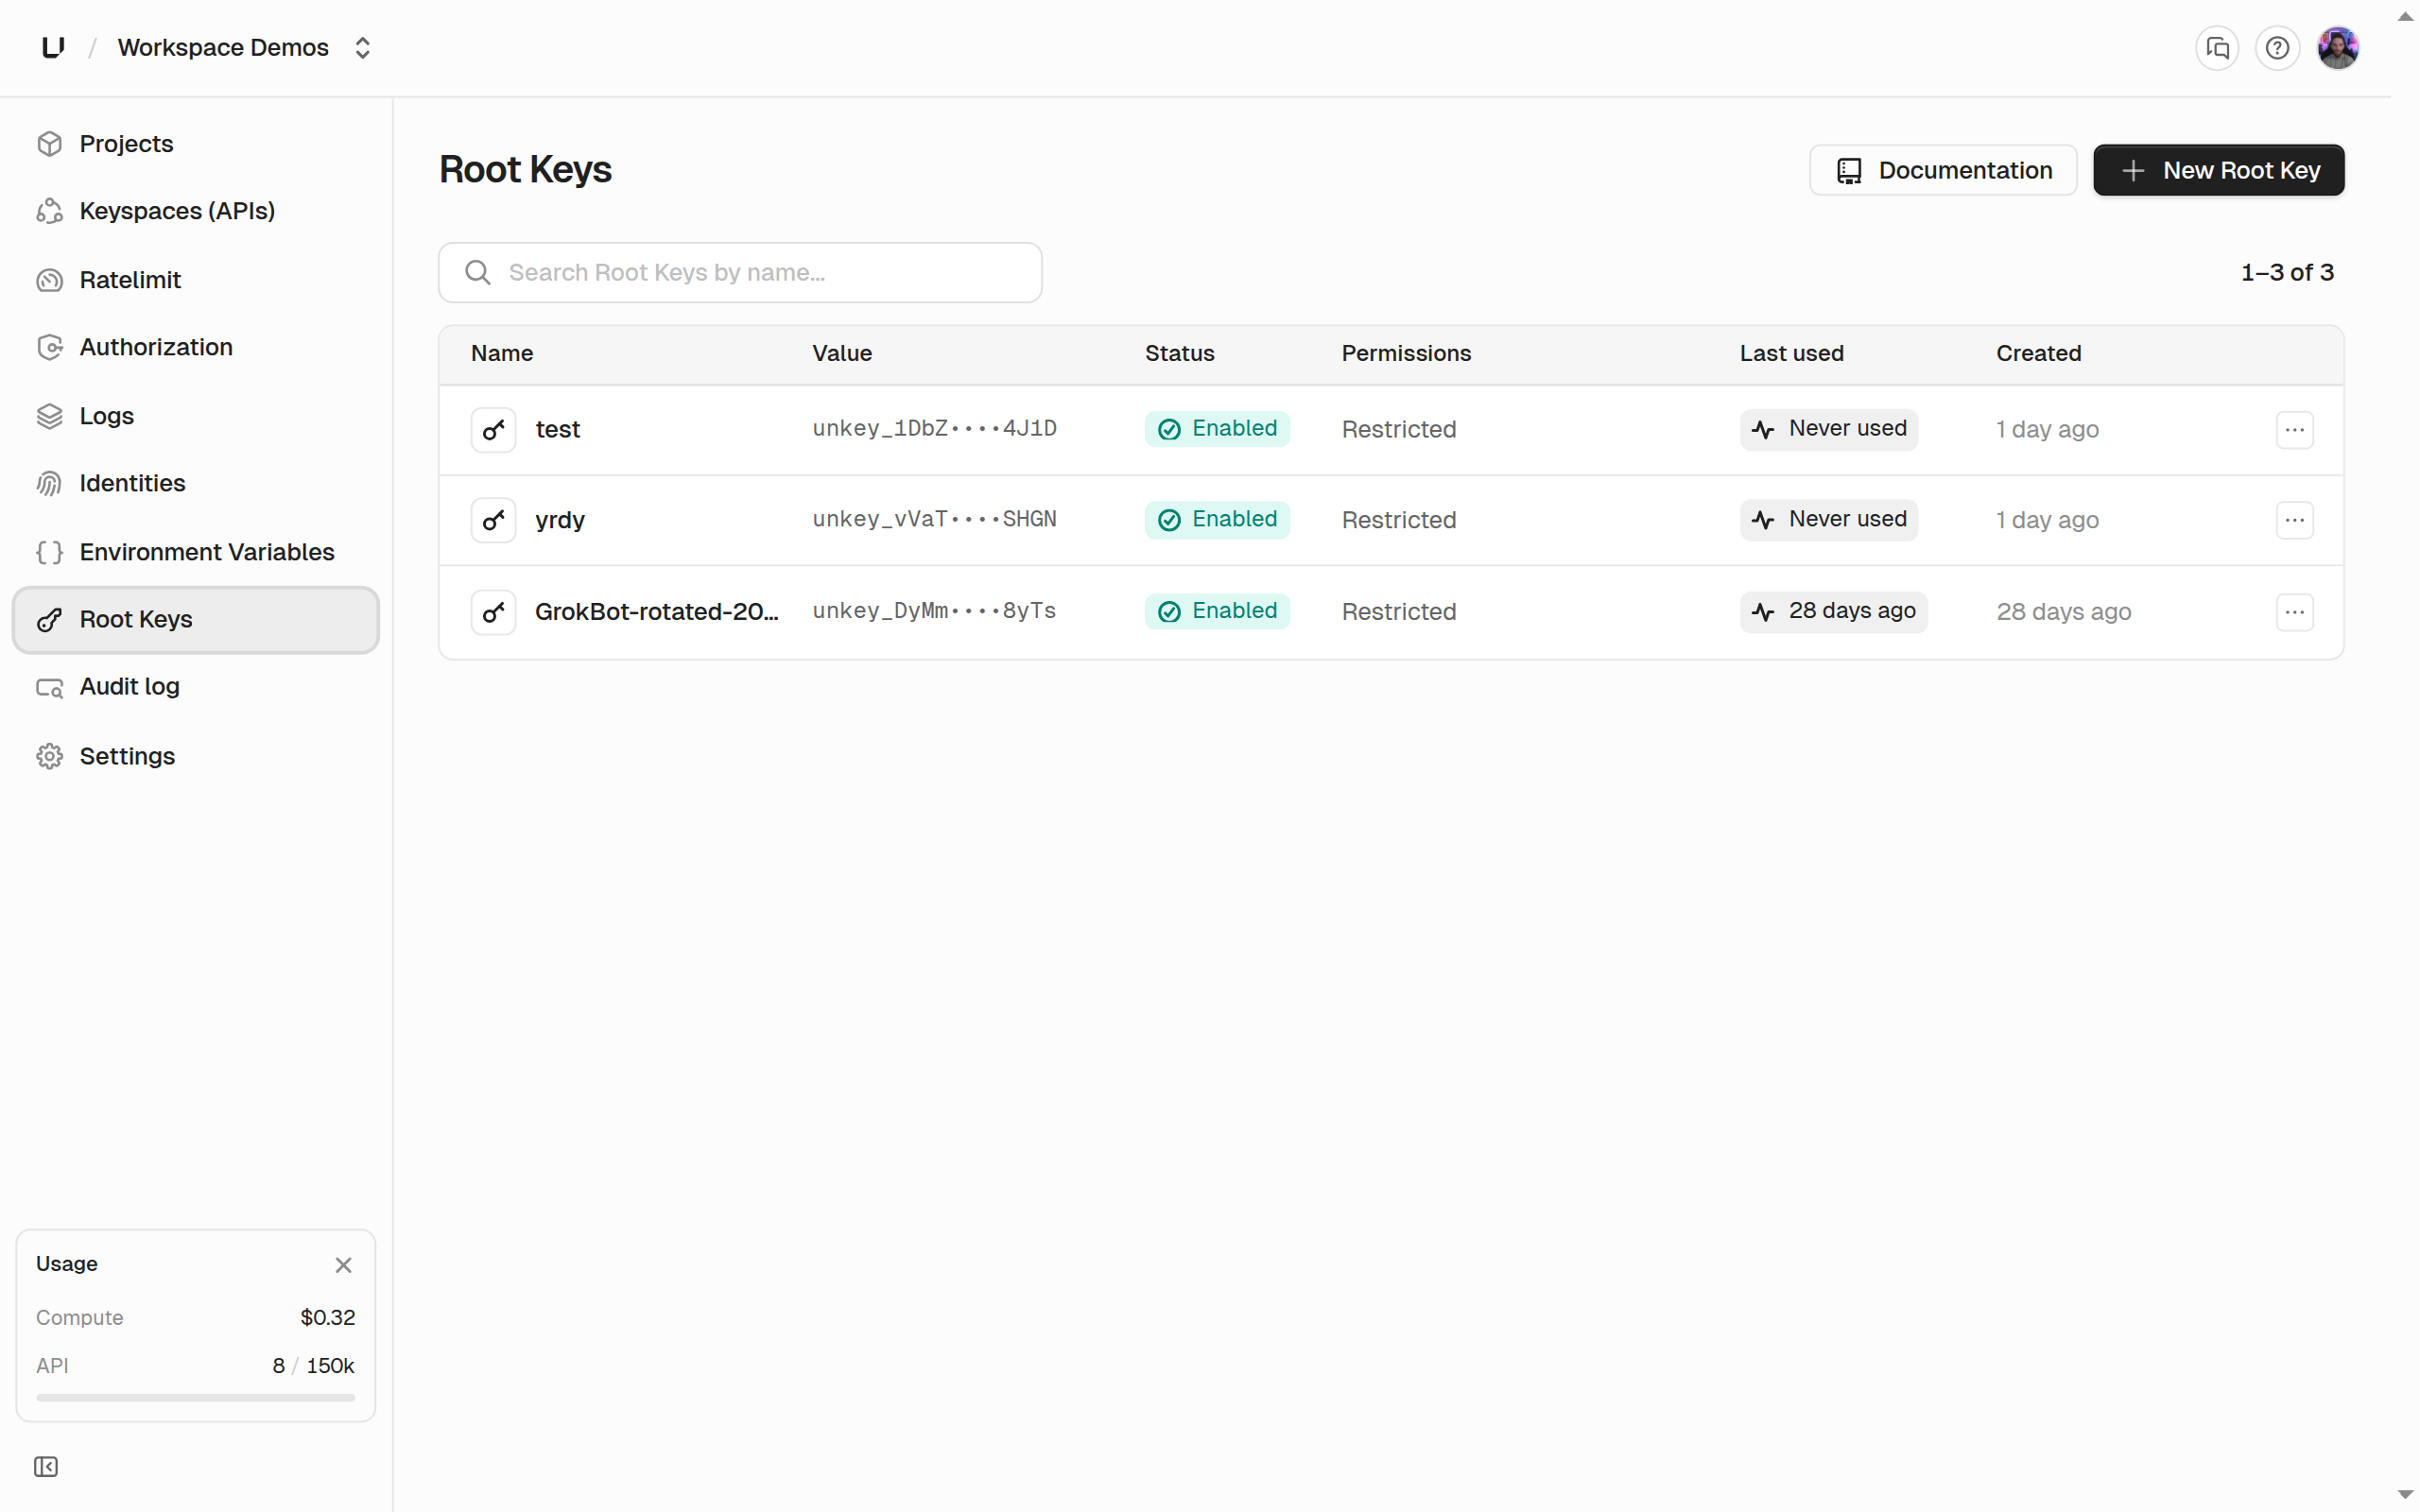
- Click New Root Key.
- Give the key a name. Name is marked Required.
- Under Permissions, click Start new. Leave Scope on Workspace.
- Tick these boxes. You only need the rate limiting boxes for the section on limiting things that aren't keys.
- Key management, Keyspaces, Write (
api.*.create_api) - Key management, Keys, Write (
api.*.create_key) and Verify (api.*.verify_key) - Identity and RBAC, Identities, Write (
identity.*.create_identityandidentity.*.update_identity) - Rate limiting, Rate limit namespaces, Write (
ratelimit.*.create_namespace) and Limit (ratelimit.*.limit) - Rate limiting, Rate limit overrides, Write (
ratelimit.*.set_override)
- Key management, Keyspaces, Write (
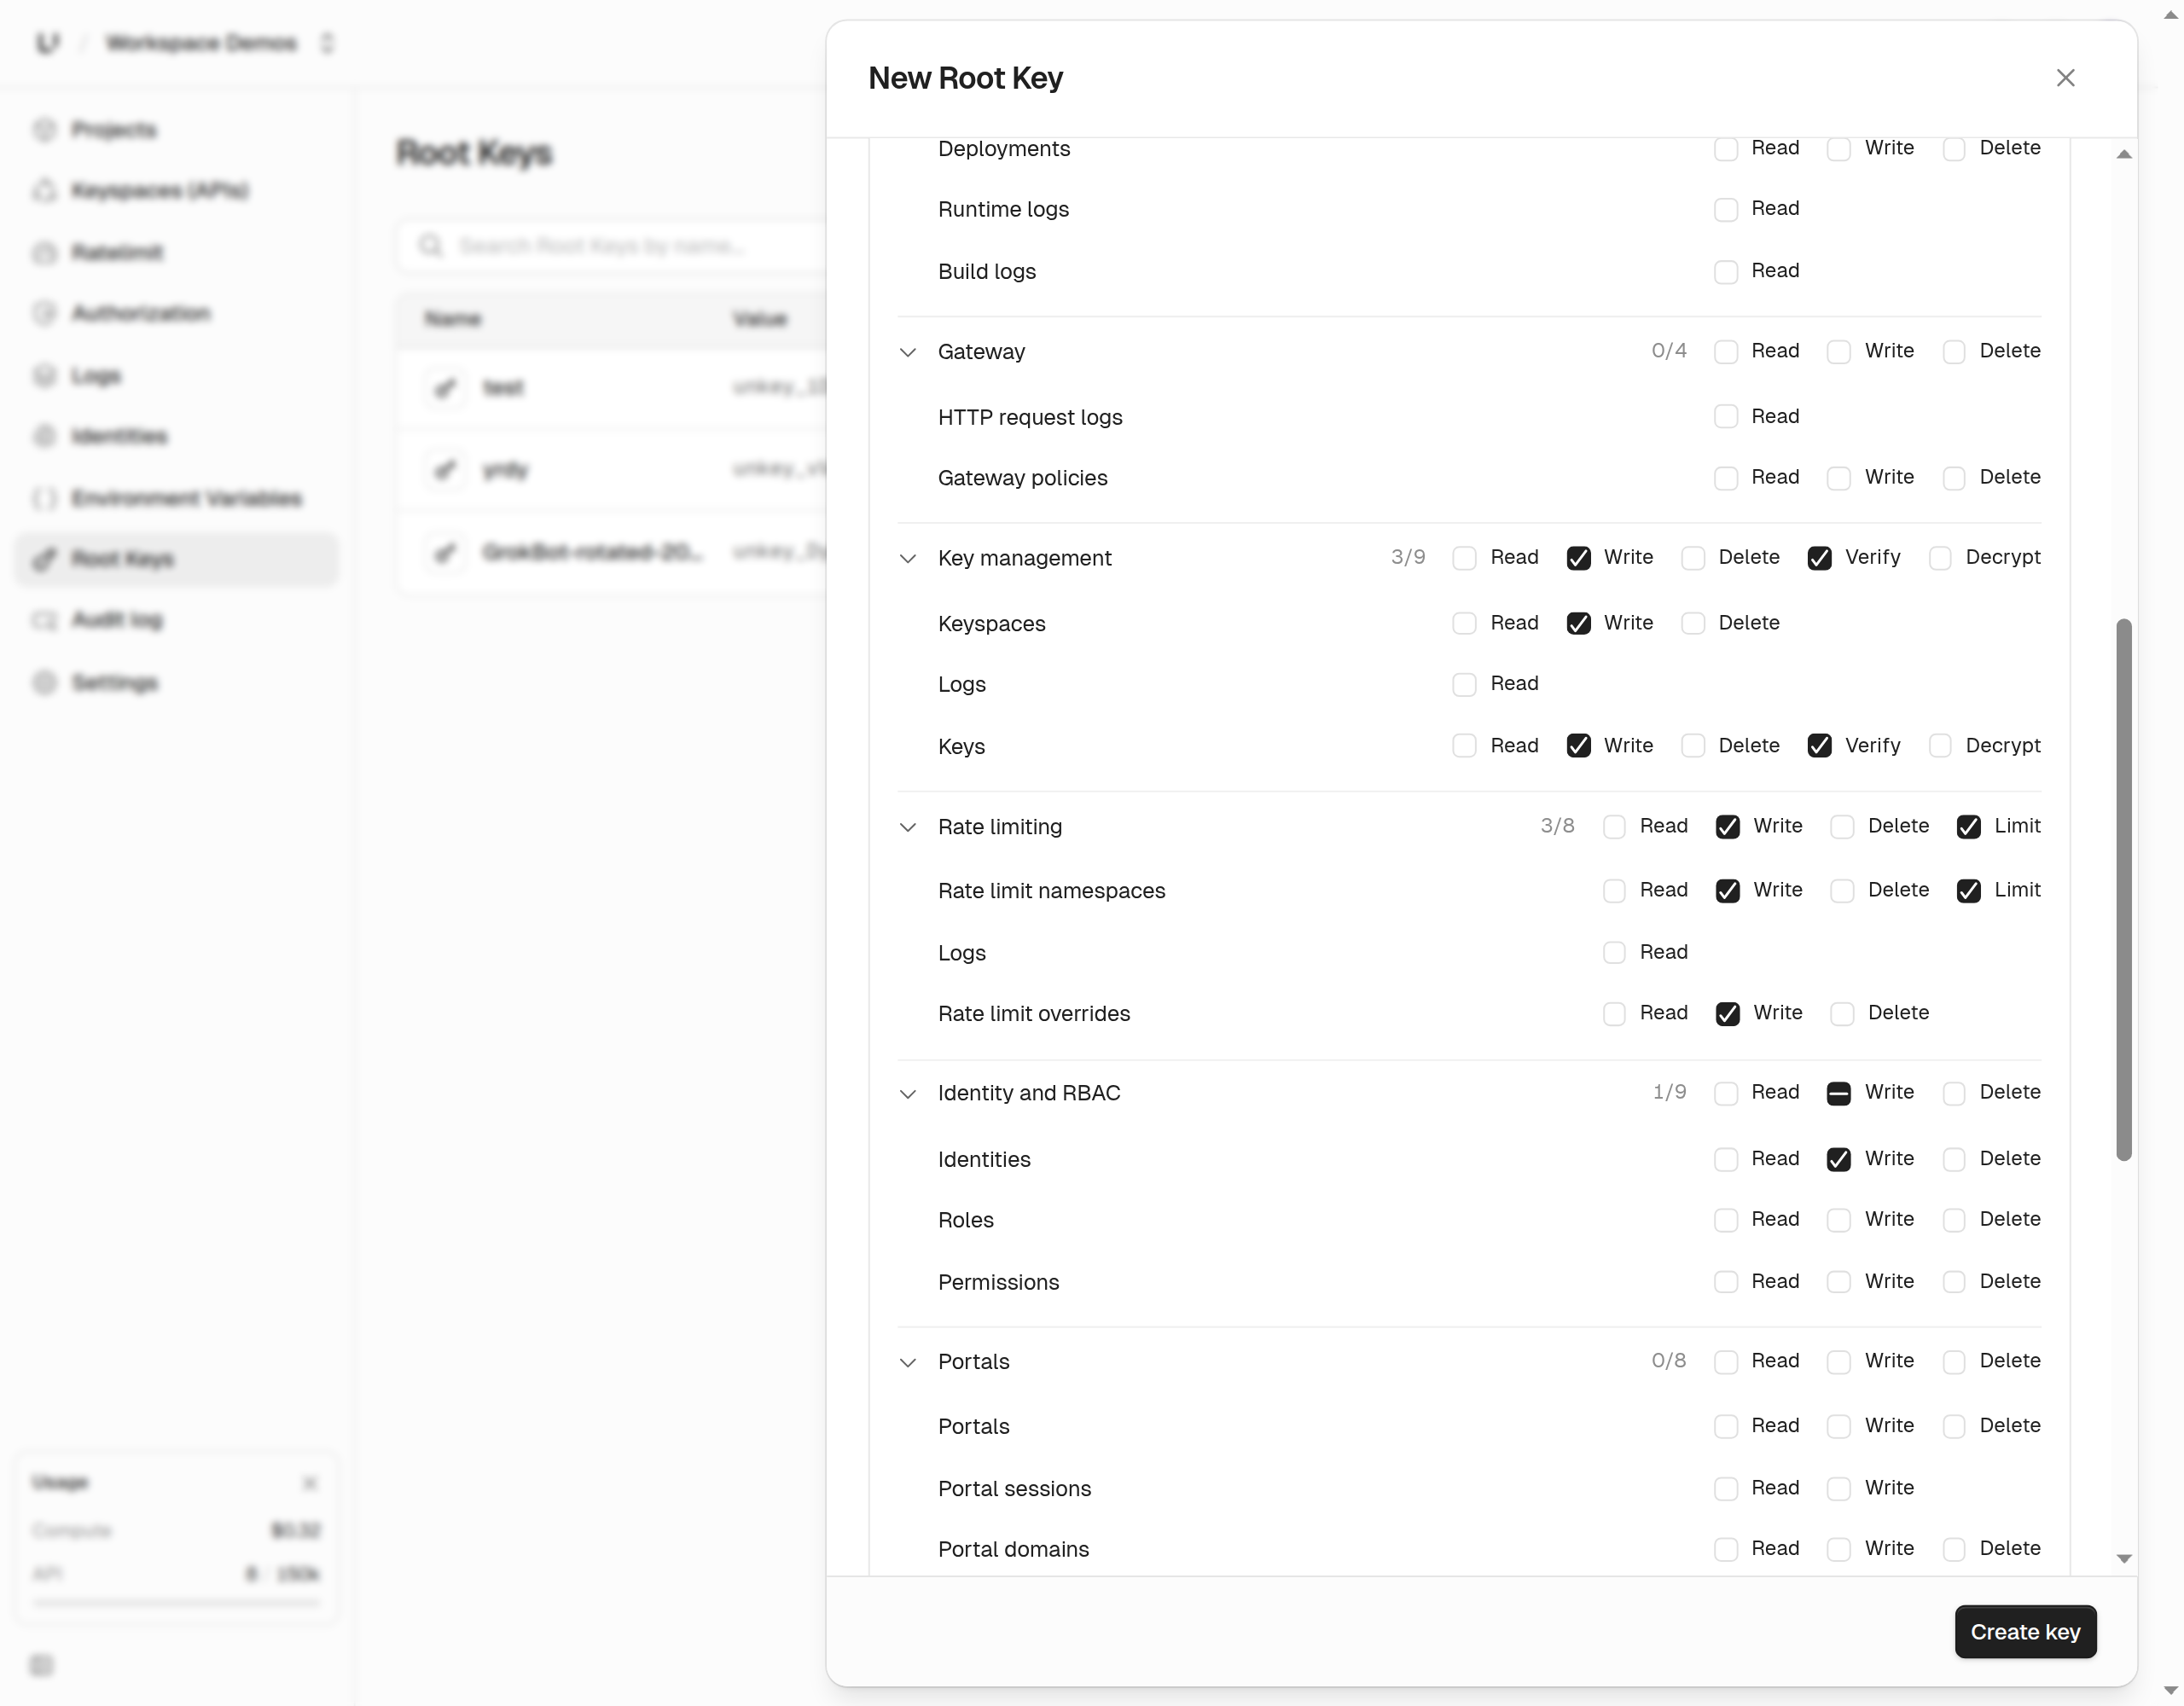
- Click Add policy, then Create key.
- Copy the key and store it as
UNKEY_ROOT_KEYon your server.
Then create a keyspace for the keys you'll hand out. The endpoint calls that keyspace an API.
Three names in Unkey are easy to mix up:
- Keyspace: a group of keys. The API endpoints call it an API, and its ID starts with
api_. It also has a second ID starting withks_, which the gateway uses. - Ratelimit namespace: a name you pick for a standalone limit, like
signup. It has nothing to do with keyspaces. - Identity: your customer.
Save the apiId as UNKEY_API_ID. The gateway policy later in this post uses the keyspace ID (ks_...). You'll find both IDs on the keyspace's Settings page in the dashboard. A keys.verifyKey response for one of its keys includes the keyspace ID as keyspaceId.
Step 2: Create an identity for the customer with a shared limit
Create the identity when the customer signs up, and give it the limit their plan includes.
duration is the length of the window in milliseconds. With autoApply: true, every verification of every key this customer owns checks the limit. Your code never has to name it. You have to send autoApply. The API returns a 400 if it's missing.
Creating a key with an externalId creates the identity if it doesn't exist yet. If you've already created a key with this externalId, the identity is already there and this call returns a 409. Use identities.updateIdentity. Step 5 covers that.
Step 3: Issue keys linked to that customer
Install the SDK and create one client you can import everywhere.
tsx runs the TypeScript files below. type=module lets them use top-level await.
Any key you create with the same externalId links to that identity. Creating the key creates the identity first if it doesn't exist. This example gives the customer one key for production and one for staging.
We only store a hash of the key. This response is the only time you'll ever see data.key.
Step 4: Verify the key and return 429 with headers
Install the server library the handler uses.
Your handler calls keys.verifyKey on every request. That call checks the key and every auto-applied limit on the key and its identity.
keys.verifyKeyreturns HTTP 200 for every verification outcome, even when the key is invalid or rate limited. You have to readdata.validanddata.code. Errors outside verification still use error statuses, like a 400 for a malformed request or a 401 for a bad root key.- It doesn't set any response headers. Your server sends the 429 and copies the limit numbers onto it.
reset comes back in Unix milliseconds. The handler turns it into seconds for X-RateLimit-Reset so it matches what the Compute gateway sends. Retry-After here is whole seconds and never lower than 1. RFC 6585 defines the 429 status and says a 429 response may include Retry-After. The header itself is defined in RFC 9110. USAGE_EXCEEDED is a different check from the rate limit. It means the key's credits can't cover the request. FORBIDDEN and INSUFFICIENT_PERMISSIONS are 403s, which is what the Compute gateway returns for them, and every other invalid key is a 401.
We tested this with both of Acme's keys. The production key made 60 requests and the staging key made 40, which is the full 100 for the minute. The next request from the staging key was rejected, even though that key had only been used 40 times. Every key Acme holds counts toward the same limit.
The first response shows remaining: 98 instead of 99. remaining is an estimate, so don't read it as an exact count. The totals still add up. 100 requests passed and the 101st was rejected.
remaining is an estimate
Unkey uses a sliding window for key and identity limits. A sliding window weighs the previous window into the current count. That smooths the burst a fixed window allows at its boundary. The rate limit policy on the Compute gateway sends every check to the same ratelimit service the API uses, so it uses the same sliding window.
We keep counters in several regions. How rate limiting works explains how. remaining is a close estimate. It isn't an exact count. Because the window slides, it can rise between two calls, and it doesn't snap back to the full limit the moment a wait ends. When one region sees most of an identifier's traffic, enforcement is tight. When traffic is split across regions, a short burst can get through in more than one region before the counts catch up. Use credits when you need an exact total.
You don't need to run Redis for any of this. We keep the counters for you.
Step 5: Change a customer's limit without a deploy
When Acme upgrades, you update the identity. Sending ratelimits replaces the entire list, so include every limit the customer should keep. This call raises requests to 1,000 per minute and adds an exports limit. The next step uses it.
The identity field accepts either your externalId or Unkey's identityId. The response shows the identity after the change.
You don't touch the handler. You don't deploy anything. Every key Acme holds picks up the new numbers on its own. Plan changes reach verifications within about 10 seconds. If your code asks for a new named limit by name, update the identity first, then ship the code that uses the name.
Call this from your billing webhook when a subscription is created, updated, or canceled. Nobody on your team has to change plan limits by hand again.
Step 6: Give an expensive endpoint its own limit
Some endpoints cost a lot more to serve than others.
Check a named limit and set a cost
The exports limit above has autoApply: false, so ordinary requests never check it. Your export endpoint asks for it by name when it verifies the key. You can also charge a single request more than one token with cost.
Same call from the SDK.
The limits you list and the auto-applied ones are checked together. If any one of them is over, none of them gets spent. exports lives on the identity, so every key the customer holds shares it. In our test, Acme used up its five exports for the hour. A later export call, from a different key, was rate limited on exports. Ordinary requests kept working.
The remaining values in that output (966, then 969) differ because the sliding window releases older requests as time passes.
If you name a limit that doesn't exist on the key or its identity, the whole call fails with HTTP 412 err:unkey:application:precondition_failed. You find out about typos right away.
Give one key its own limit
Give that key its own limit with the same name. It replaces the identity's limit for that key alone.
When we verified that key, requests came back at 5,000. Acme's other keys still showed the 1,000 they share.
Inline limits count on the key
You can also pass limit and duration inline, inside the verification's ratelimits entry. An inline limit counts against the key. It doesn't count against the identity.
The API doesn't reject a limit below 1 or a duration below 1000. The verification silently skips every rate limit instead, including the auto-applied ones, and can still come back valid. We sent limit: 0 and got back:
Check those numbers in your own code before you send them.
Limit anything that isn't a key
Sign-up, login, and password reset happen before anyone has an API key. Use ratelimit.limit for those, and for an IP, a session, or a tenant. Pick a namespace for what you're limiting and an identifier for who is doing it, then send the limit with each call.
We called it six times for the same IP.
It returns HTTP 200 whether the call is allowed or not. keys.verifyKey does the same for verification outcomes, so check data.success. The first call that uses a new namespace name creates that namespace.
To give one identifier a different number without changing code, set an override. The examples below use a limiter on a different namespace, api.requests, called with limit: 100.
We hit one snag doing this. The namespace has to exist before you can override anything in it. Call ratelimit.limit on it at least once first, or ratelimit.setOverride returns 404 ratelimit_namespace_not_found.
The code still sends limit: 100. cus_acme now gets 1,000. The response includes the override so you can tell it applied. An override can take up to about a minute to apply everywhere, and about a minute to revert after you delete it. Poll. Don't assume it's live right away.
Sometimes one action has to pass several limits, for example one per user and one per organization. ratelimit.multiLimit checks up to 100 of them in a single call and only counts them if every one passes.
The response has a passed field for the whole call plus one entry per check. When we sent a cost bigger than the token limit allowed, passed came back false. None of the checks were counted, including the ones that passed on their own.
Rate limiting at the gateway with no code
If your API runs on Unkey Compute, the gateway checks keys and enforces limits before a request ever gets to your app. Add policies in the app under Policies > Add Policy, or set them through the API.
Use the keyspace ID (ks_...) from Step 1 in keyspaces. Don't use the api_ ID.
- The Key Auth policy works the same way as
keys.verifyKey, so it already enforces the identity and key limits from Steps 2 to 6. - The Rate Limit policy adds a second limit on top.
authenticatedSubjectresolves to the identity'sexternalIdwhen the key has one, and to the key ID when it doesn't. It counts per customer. It uses the same sliding window. - Put the rate limit after key auth. If it runs first, every request counts as
unknown. - Policy changes take effect on the next deployment, so redeploy after you save them. The root key needs
environment.*.set_policies. - The gateway sends
X-RateLimit-Limit,X-RateLimit-Remaining, andX-RateLimit-Reset(in Unix seconds) on its responses, plusRetry-Afteron a 429.
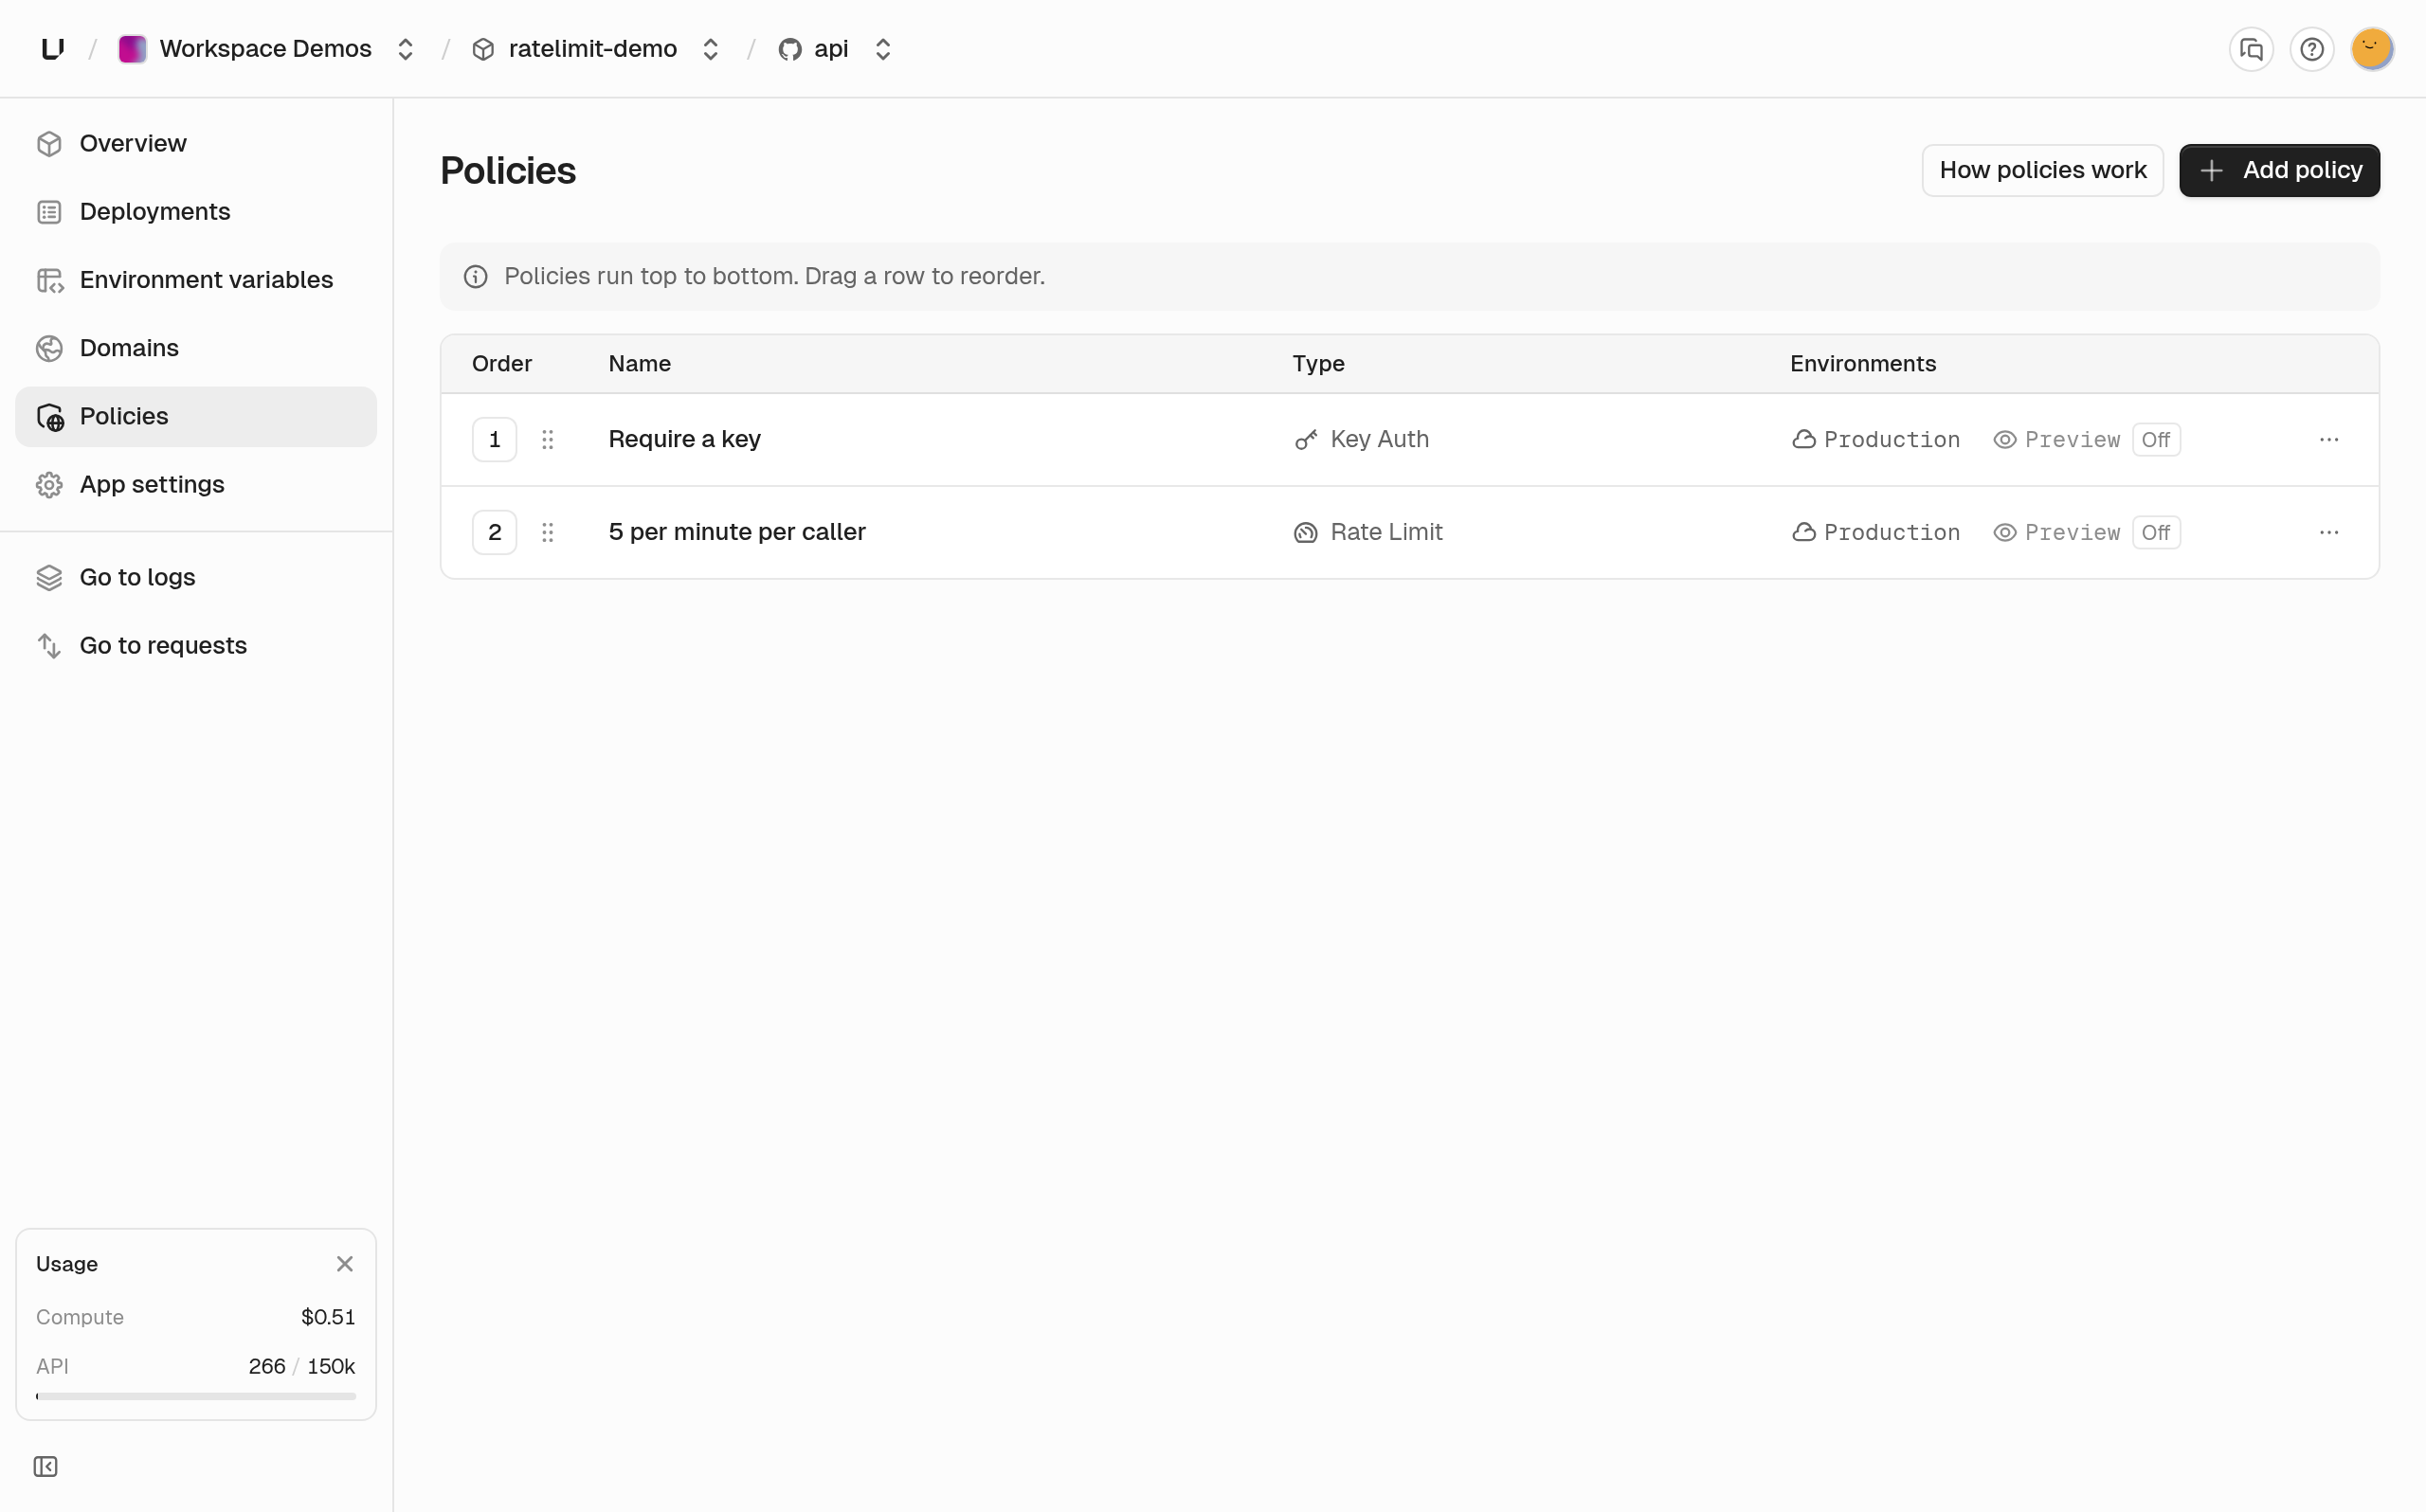
The Policies screenshot and the response below are from a Compute app limited to 5 per minute so the 429 was easy to hit. Raise the limit for production traffic.
We hit /health six times in one minute with a key for cus_acme. The first five returned 200. The sixth returned 429.
Pick the failure you can live with
The two paths behave differently if rate limiting itself breaks.
keys.verifyKeyfails open. If the rate limit check can't run, the docs say verification carries on as though every limit passed, so an outage on our side never blocks a valid key. You want that for a limit that protects capacity. For a security limit, you don't.- The gateway rate limit policy fails closed. If it can't run, the request gets a 500. It doesn't go through.
Wait for Retry-After
A client that hits the limit in the handler above gets this response.
Wait the number of seconds in Retry-After. Add a little random jitter so clients limited at the same moment don't all retry together. Give up after a few attempts. If the header is missing, fall back to exponential backoff.
We pointed it at a customer limited to 3 requests per 5 seconds and made five calls in a row, with a log line added to the retry branch.
Request 4 still shows remaining=0 after the wait, and request 5 shows 1. The sliding window still counts part of the earlier window. remaining climbs back gradually. It doesn't jump to the full limit.
If you ship an SDK, build this retry into it. A client that retries immediately in a loop adds load.
See who is getting limited
Every verification and every ratelimit.limit call ends up in analytics.
- The identity page lists each request as Valid or Ratelimited, with the key id and the region. Rejected verifications (including rate limited ones) show up here.
- Edit ratelimit on that identity holds the named limits. The dialog may need a scroll to show every rule.
- Filtering Outcome is RATE_LIMITED leaves the rejected requests.
- Under Ratelimit in the sidebar, open a namespace and its Overrides page to see identifiers that have a different limit.
Pick your limits from this data. Look at what your paying customers actually send at their busiest. Set the default plan limit comfortably above that, then watch who runs into it. A customer who gets rate limited every day is abusing the free tier, or they're ready for a bigger plan. Talk to them either way.
Checklist
- Put the main limit on the identity so all of a customer's keys share it, and link keys to it with
externalId. - Give a single key an exception with a key limit of the same name.
- Change plan limits with
identities.updateIdentity. You don't need a deploy. - Use
autoApply: falsenamed limits orcostfor expensive endpoints. - Use
ratelimit.limitwith overrides for anything that isn't a key, andmultiLimitwhen one action must pass several limits. - When you call
keys.verifyKey, return the 429 andRetry-Afteryourself. The Compute gateway sets them for you.
The reference docs are the per-user rate limit cookbook and the key and identity limits reference.